Monday, December 13, 2010

Christmas Craft Fair Items

This year my Scarlet Sophisticate group decided to have vendors at our big Christmas party to sell items prior to the party and during break time. They asked me to set up a table. I concentrated mainly on making stocking stuffer-type items. I sold the majority of what I took, so I was happy with the results. Here are some of the items I made to sell. I forgot to take pictures of the red hat cards I made and the bags of Santa Kisses (Hershey's Kisses), Reindeer Kisses (Soft Peppermint candy) and Rudolph's Spare Noses (Red Hot candies).

First off, these are place setters I made so that the waiters would be able to tell who ordered what. Everyone got one for what they pre-ordered - beef, chicken or fish to set out with their place setting. I used retired sets for the fish - "Fish Frolics" and the chicken - "Walk This Way". The cow is from a non-SU! stamp set I have and was just too cute to not use.


Here are the items I sold:

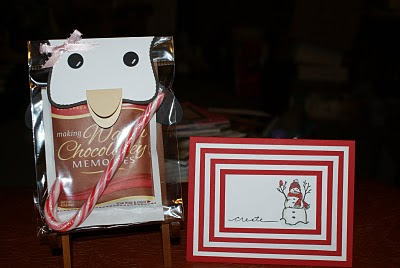
Nugget Tins (These are my favorite)

Freeze-dried Snowballs (Tic Tacs). These are an exact case from another demo, but I can't remember who, so if you know or it is you, let me know, so that I can give that person credit. The stamp set used is "Punch Pals".

Wrapped mini Hershey bars and Kit Kats

Test Tubes with M&Ms in holders (tutorial by Lisa Somerville)

Snowman Soup (again I can't remember who made the tags I used for the snowman soup. She also made the tags I used for the Reindeer Kisses). The snowman face and hat are made using the Top Note Die. I have seen these done by many people and love them.

Update: The tag sheets I used for the Snowman Soup and Reindeer Kisses were done by Kimberley Morris. You can get them and several others on her blog.

Lip Balm in holders. (tutorial by Melissa Stout)

Friday, December 3, 2010

Sr. Ctr. Card Day

We made our final batch of Christmas cards for this year. This time we primarily used the new "Bells & Boughs" stamp set from the Holiday mini. Here are some a couple of the ladies made.


This is one I made for Terri - she runs the kitchen at the center. She is busy getting lunch ready for the ladies, so does not join us to make cards, but she asked me to make her one, so I threw this together for her at the end. I used the "Jolly Old St. Nick" stamp set from the Holiday mini.
We used some retired DSP on the cards.


Wednesday, December 1, 2010

My Digital Studio Cards

I have been playing with My Digital Studio program again and lovin' it! I made 2 cards and even sent one off to be printed, to see how it comes out and make sure I did it right - LOL! The first card I made is a penguin and is all MDS punches. It was inspired by Wendy Hawkinson, check hers out on her blog.

On the second I used the MDS stamped images from Winter Post and some DSP and ribbon embellishments and punches. This one took me a little longer to put together, but I like the way it came out. Now that I have done it I think future ones will be easier to do. This is the one I sent off to be printed, I figure if it comes out okay, then I did it right and should be okay for future projects. I'll let you know how they come out when I get them.


Sunday, November 28, 2010

Prepping for a Christmas Red Hat Vendor Fair

I have now been busy making things to sell at my Red Hat Scarlet Sophisticates Christmas Party. We are having vendors this year to sell pre-party time. Mostly red hat vendors and a jewelry vendor and I was asked if I wanted to set up a table of wares and decided I would. I am making some Christmas cards and stocking stuffers and some red hat cards. Should be a lot of fun. So far I have made some 1x8 bags with York Peppermint Candies and one style of Christmas cards. I will be selling the cards as a boxed set of 6 and individually.


1x8 bags with York Peppermint Candies.

The polar bear was inspired by Nancy Dawson, she has instructions on her blog.

The snowflakes are from the Northern Frost Decorative Die Strip.


Look closely to see that I have used the Northern Flurry Embossing Folder on this card and a rhinestone in the center of the larger snowflakes. The blue snowflake is from the Northern Frost Decorative Die Strip.

More Thanksgiving Treats

I made these 1x8 little treat bags with Fall M&Ms for my red hat Scarlet Sophisticates group. Every year we go to Bob Evan's for an early Thanksgiving feast. I handed these and a little turkey nugget out all the gals. We do love our chocolate - LOL!

I had enough left over of each for DH to take and give out to his van pool the next day. I even had a request for the bags and toppers from one of my ladies. SHe was in charge of a craft project for the kids on Thanksgiving and thought these would be cute (and easy) for them to do and then write everyones names on them and use them for place setters as well. So I made another run up to Woodbridge the next day to take the bags and pre-punched scallops and pre-stamped images to her. She had to use Reeses Pieces in hers as neither of us could find the Fall colored M&Ms anymore.

Friday, November 12, 2010

Sr. Ctr. Cards and Line Dancers

I went today for my monthly card making day at the Sr. Ctr. We made a Thanksgiving's Day card and a couple of Christmas cards.

This card used the French Foliage stamp set from the current Holiday mini. The words are from a retired set called Country Blessings and punched out with the new 2-3/8" Scallop Circle Extra-large punch.

Look closely and you can see the embossed images on both of these cards. I had pre-done this using the Stampin' Up! Northern Flurry embossing folder. You could dress these up with some of the self-adhesive rhinestones or pearls that Stampin' Up! sells. I had also cut out a bunch of Bashful Blue snowflakes using the Northern Frost Decorative Strip Die, but they opted not to use them this time - I will come up with another card for next month using them. One of the ladies decided she was not in the mood to stamp today, so I did take one of my samples (these belong to one of the ladies that stamped) and dressed it up with a small Bashful Blue snowflake on a blue card like the one on the left and put it on the upper right side of the scallop and added a tiny pearl to it (forgot to take a picture of it). It really looked nice.

After we made cards, it turned out that they had the HeeHaw Line Dancers coming in to perform for the Seniors, so my friend Bobbie and I (she goes with me now) stayed to watch and have some lunch with them (they had a nice little spread of finger sandwiches and cake - Yum!

Here I got the Activities Director, Janie, joining them in their performance for the first couple of routines. They were very good.

At the end they did the Electric Slide and asked for anyone who wanted to join them, so I and one other lady volunteered to dance. Bobbie took my camera and sneakily got this shot of me - Ugh!

Afterwards, they put their hats on a couple of us for a photo opt....yep - that is me in the front row midde. My knees were killing me by the time we finished the dance, but I enjoyed myself as I love to do line dances. I would love to join a group like this, but my knees and legs (shins) would not allow it. Maybe someday if I ever get my knees replaced.

Happy Mail Days Again

Boy, I wish I could always get mail like this. It is so nice to get something besides bills and junk mail. Yesterday and today held surprises. Yesterday, I got the blog candy I won on Alicia Schukar's blog. What I won was a mystery and I promised I would share when I received it, sooooo... here is what I got:
A beautiful card and a roll of the Chantilly ribbon - LOVE IT!
I'd been wanting to get some, but always found something else I wanted/needed more at the time, so now I have some and can't wait to play with it. I've seen some beautiful cards with it...have the DSP and now the ribbon, so time to start CASEing some more cards - LOL!
Today I received another package from my cousin Deb, with the payment for yet another order from her and these items as well. I had seen them on her blog and LOVED them and was so pleased to be a recipient of them. Isn't the penguin adorable and the card is soooo pretty. She loves layers and does them so well. She did the penquin bag this past week when she made things at her local Sr. Center. Hmmmm, may have to go and get some hot chocolate and candy canes and make these next month when I go to my Sr. Ctr.

More Turkey Nuggets

Well, I made another batch of turkey nuggets, however this time I did add a waddle. I think they look more like a turkey now. So cute! See previous post for link to Kimberley's blog for her tutorial. I will show you how I made the waddle (learned this from someone else a few years ago).

To make the waddle, first punch out a scallop circle and then reinsert the edge of about 2 scallops (more if you need a larger one). Work around the edge of the scallop to make as many as possible from that circle scallop. It also kinda' looks like a worm, so you could make it a worm in a birds mouth or something.
This is a punch art turkey I made a few years back (another CASE) and is the first time I made the waddle - used 3 scallop edges for this one.

Wednesday, November 3, 2010

Turkey Nuggets

I was inspired by Kimberley Morris to make these cute little turkey nuggets for my red hat groups this month. They are sooooo darn cute and easy to make...Kimberley has a tutorial on her blog. I used the new Autumn Spice DSP from the mini catalog and Early Espresso, Cajun Craze and More Mustard cardstock to go with it for mine. One of my groups met for lunch today and received one...they loved them. I don't know that any of these little guys will be eaten, I think they were all given a pardon for this year.


The one thing I did notice after I finished these was that they don't have a waddle (you know, that ugly red thing that hangs down the side of their beak) I may see if I can make one to go on future ones (I have 2 more groups to make them for, plus I want to take some to my ladies at the senior center).

Monday, November 1, 2010

I Won Some Blog Candy!

Woo Hoo! I won some blog candy on Alicia Schukar's blog. I can hardly wait to get it and see what I got - she is being secretive - LOL! I will let you know once I get it!

Saturday, October 30, 2010

Another Happy Mail Day

When I returned home on Wednesday (also went to a Halloween luncheon at the Sr. Ctr. I do cards at) and went thru the mail, I had a card from my cousin Deb (she sent me the decorated CD cases in a previous post - forgot to mention that also included a small Stampin' Up! order) along with her payment for her order. Here is the gorgeous card she sent. This card is using the Stipple Butterfly stamp (retired).

More Halloween Fancy Favor boxes

This past Wednesday my Red Hat Scarlet Sophisticate group went to the Bavarian Chef German Restaurant for dinner. It was delicious, but still not as good as my favorite German restaurant in Ft. worth - Edelweiss. They have spoiled me for all others, I think! Anyway, I made more of the candy wrapper treats (pictured in previous post) for the ladies and these with the fancy favor box and Wicked Cool stamp set for Queen Jeri and Vice-Queen Fran.
Here are a few pictures of the ladies in their regalia.
Love Karen's red witch hat

Monday, October 18, 2010

Stamping With Style Team Meeting

On Sat. I went to my upline, Christina's team meeting. Had a great time. Got there late, so I only go one of the make-n-takes done. It was with the Bingo card and Jolly Bingo Bits set and we then played Bingo for some great prizes. I didn't win anything - Boo Hoo! I won't show mine as I messed it up and it didn't look too good. (I was trying to hurry, so I could do another make-n-take, but that didn't happen). Had a great time, lots of great info and samples and of course, food.
Here is my swap. I used the "thumping" technique on it for the leaves.


Here are the swaps I received in exchange for mine - Aren't they lovely!

Wednesday, October 13, 2010

Halloween is Quickly Approaching

I have been busy since last week cutting, decorating and filling these little candy wrappers (the ones in the background). They are made using the new Candy Wrapper die from Stampin' Up! One of my best friends and customers got it and let me play with it first (isn't she wonderful). I ended up cutting out 60 of them, before I gave it to her. So, I decided to put them together and give them to each of my red hat groups when we got together this month. I used "Batty for You" and "Wicked Cool" stamp sets to decorate them. The first group was my Busy Bee group and we got together last week for a luncheon at one of the members house (with a Halloween theme) and had a great time playing Bingo and eating some little monster sandwiches (pictured below as they were sooooo darn cute). I didn't get pictures of the treats boxes I made last week, the ones pictured below are for my Sweet Magnolia group tomorrow (but are the same). The little treat box in the front is made with the Stampin' Up! Fancy Favor Die and decorated using the "Wicked Cool" stamp set. I may have to breakdown and purchase the Candy Wrapper die, as I had so much fun making these and they are very simple. May make some for Christmas as well.


Aren't these little monster sandwiches adorable. They were yummy, too!

Thursday, September 16, 2010

New Recruit Special Offer!

Join the Stampin' Up! family as a demonstrator during this promotional period and received this Greenhouse Gala Craft Tote FREE (valued at $39.95) with the purchase of your Starter Kit. Click here for details! Contact me now if you would like to join my team! You can also sign-up thru my DBWS. The password to use is angel56.

Sunday, July 18, 2010

We're Grandparents!!!!

My son, George and his wife Mandy had their baby on 7/16 at 5:50 am. I arrived just in time to be here for it (7/14). Carma and I stayed home while they went to the hospital as they had gone a few hrs. before and they sent her home, but her labor got more intense and was all back labor and was really getting hard on her so my son took her back and within an hr. or so after they got there, Brexton was born. Just like his daddy, once he decided it was time to make an appearance, that was it, he was coming(unlike his daddy he was 2 days early, George was 9 days late). He weighed in at 7 lbs. 15 ozs., 19.5 inches long. He has reddish (strawberry blonde) hair like his daddy and looks like him as well.
Me (Proud Grandma) & Brexton
Carma, Mandy & Brexton
George & Brexton

Monday, June 21, 2010

Father's Day Card for DH

Well, I did get a card made for DH for Father's Day. I was so excited about the new King of the Grill stamp set in the Summer Mini as my DH loves to grill and I knew that one of his presents was going to be the new grill cover he wanted for his gas grill (which he got some years back as a Father's Day present). I also used the metal sheets (silver not colored side) that I got from Monica.

Saturday, June 19, 2010

Patrick's Memory Pail

Well, I finally put the finishing touches on my nephew's memory pail. It only took me almost a year - LOL! It kept getting put aside and then I'd forget that I hadn't finished it and then would come across it and do a little more. I'd only really needed to attach the train and put the ribbon on it, but could just never get myself to sit down and do it. I made myself do so last night and this afternoon I finally finished it. I am very pleased with how it came out. I had finished the one for his new little brother (see Aug. 30th, 2009 post for pics of it) and after awhile got started on his. He was the only nephew that did not have one as I started making them after he was born and I decided he needed to have his own. I didn't make him a gallon-sz. one, just the quart size pail, but I think that worked best with the size of the stamp set used. I used Stampin' Up's Choo Choo set, since he likes Thomas the Engine.

The poem I normally use for the Memory Cans wasn't quite right, so I wrote my own for his can. Thanks to Susan and Jan for their suggestions last year to fine tune it.

The ribbon is attached to a key for opening the lid (something I just started adding to them).

Thursday, June 10, 2010

Graduation Card

Well, I am late as usual, but I finally got a graduation card made for my niece, Reina, that graduated on May 20th and got it mailed off today (of course with a little something inside).

I used the green metal sheets that I won from Monica's blog. I absolutely LOVE them and will be using them more (and getting more). I won 5 sheets and got them in different colors to play with. I embossed them with the new Lattice embossing folder from Stampin' Up! in the Summer mini and then sanded it to bring out the design in silver. I layered it using Garden Green and Chocolate Chip cardstock. The stamp set used is "Go, Graduate" and "Happy Grad", both also from the Summer mini.


Tuesday, June 8, 2010

The Last Chance List is HERE!

Check the sidebar for links to the lists of retiring stamps, Definitely Decorative items (25%off), and accessories. Remember, items on the accessories list are "while supplies last", so order now if you see something you want.

Summertime Splendor DSP on MDS


Stampin' Up! has a new DSP available on My Digital Studio Downloads. I absolutely love it. Here are some samples made with just a fw of the choices in it. Thanks to Patty Bennett for her tutorial on how to get just a segment of the 12x12 paper onto and 8-1/2"x11" cardstock in 4 sections, sized perfectly for card fronts. I will be making more in the future, for sure!

May 2023 MPP - Exploring In Color

I LOVE this month's cards, especially the ones with the buffalos. They remind me of our trip to hubby's sister's country home in...